
Your garage is often an overlooked and underutilized space in your home. It's usually where you store your tools, equipment, and vehicles, and it's often cluttered and dirty. But what if you could transform your garage into a functional and stylish room in your home? One way to do this is by installing an epoxy floor coating.
Epoxy floor coatings are a durable and attractive option for garage flooring. They are made of a mixture of resin and hardener that, when combined, create a thick, durable coating that can withstand heavy foot and vehicle traffic. Epoxy floor coatings are also resistant to chemicals, oil spills, and stains, making them a great option for garages.
In this article, we will discuss the benefits of installing an epoxy floor coating in your garage and the step-by-step process of installation. We will also give tips on how to maintain and care for your epoxy floor coating.
What are the Benefits of Epoxy Floor Coating?
- Durability: Epoxy floor coating is a durable and long-lasting solution for garage floors. It can withstand heavy foot traffic and vehicle movement, making it ideal for high-traffic areas.
- Easy to Clean: Epoxy floor coating is non-porous, which means that it is resistant to stains and spills. This makes it easy to clean and maintain.
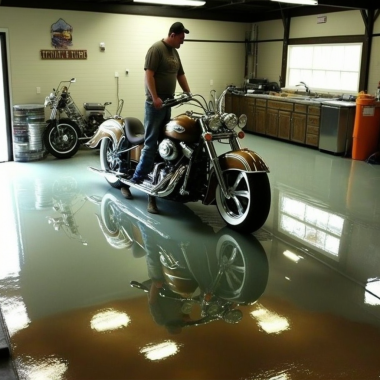
- Improves Aesthetics: Epoxy floor coating comes in a variety of colors and finishes, allowing you to customize the look of your garage floor.
- Increases Property Value: Installing an epoxy floor coating can increase the value of your property. It is a cost-effective way to enhance the appearance and functionality of your garage.
- Aesthetically Pleasing: Epoxy floor coatings come in a variety of colors and finishes, so you can choose the one that best matches your garage's aesthetic. They also have a glossy finish that can make your garage look sleek and modern.
- Cost-Effective: Installing an epoxy floor coating is a cost-effective way to improve the look and functionality of your garage. It is also a more durable and long-lasting option than other types of flooring, so you don't have to worry about replacing it as often.
Materials and Tools Required
- Epoxy floor coating kit
- Concrete surface cleaner
- Concrete etcher
- Concrete degreaser
- Concrete filler or patching compound
- Concrete primer
- Epoxy topcoat
- Epoxy sealer
- Roller and paint tray
- Stir sticks
- Gloves and safety glasses
- Masking tape
Step-by-Step Instructions
- Clean and Prepare the Surface: Begin by cleaning the garage floor with a concrete surface cleaner and degreaser to remove any dirt, oil, or other contaminants. Allow the surface to dry completely.
- Etch the Surface: Use a concrete etcher to roughen the surface of the concrete and create a bonding surface for the epoxy coating. Be sure to follow the manufacturer's instructions for application and safety precautions.
- Repair any Cracks or Holes: Use a concrete filler or patching compound to repair any cracks or holes in the surface of the concrete. Allow the filler to dry completely before proceeding to the next step.
- Apply Primer: Apply a concrete primer to the surface of the garage floor, following the manufacturer's instructions for application. Allow the primer to dry completely before moving on to the next step.
- Apply the Epoxy Coating: Mix the epoxy coating according to the manufacturer's instructions and pour it into a paint tray. Use a roller to apply the coating to the surface of the garage floor. Be sure to work in small sections and overlap each pass to ensure an even application. Allow the coating to dry completely before applying the next coat.
- Apply the Epoxy Topcoat: Mix the epoxy topcoat and apply it to the surface of the garage floor using the roller. Allow the topcoat to dry completely.
- Apply the Epoxy Sealer: Mix the epoxy sealer and apply it to the surface of the garage floor using the roller. Allow the sealer to dry completely.
- Remove Masking Tape: Remove any masking tape used to protect the surrounding areas from the epoxy coating.
- Preparation: The first step in the installation process is to prepare the surface of the garage floor. This includes cleaning and repairing any cracks or damage.
- Epoxy Application: Once the floor is prepared, the epoxy coating is applied in several thin layers. The exact number of layers will depend on the product used and the condition of the floor.
- Finishing: After the epoxy has been applied, a clear topcoat is applied to provide a smooth, glossy finish.
- Drying: The epoxy and topcoat need to dry completely before the garage can be used. This can take anywhere from 12 to 24 hours, depending on the product used and the humidity level.
Tips for Maintenance
- Keep the floor clean: Regular sweeping or mopping will help to remove dirt and debris before it has a chance to scratch or stain the epoxy.
- Use a pH-neutral cleaner: Avoid using harsh chemicals or abrasive cleaners on the epoxy floor. A pH-neutral cleaner is best for maintaining the integrity of the coating.
- Be mindful of heavy objects: Avoid dragging heavy objects across the epoxy floor as this can scratch or chip the coating.
- Avoid parking on the epoxy: If possible, avoid parking vehicles on the epoxy floor. This will help to prevent oil stains and other damage.
A garage epoxy floor coating is a great way to enhance the look and durability of your garage floor. With proper preparation, installation, and maintenance, it can last for many years. By following the tips outlined in this article, you can ensure that your garage epoxy floor coating will be a beautiful and functional addition to your home for years to come.