Introduction to DIY Distilled Water
Distilled water is water that has been boiled into vapor and condensed back into a liquid in a separate container, leaving behind impurities and contaminants. This process mimics the natural water cycle of evaporation and precipitation, ensuring that the resulting water is exceptionally pure. Making distilled water at home might sound like a task for scientists, but it's actually quite straightforward and can be done with some basic kitchen equipment.
Why Make Distilled Water at Home?
There are several compelling reasons to distill water yourself. For starters, it guarantees a supply of pure water devoid of chemicals, minerals, and other impurities commonly found in tap or even bottled water. This purity makes distilled water ideal for a variety of sensitive uses such as filling lead-acid batteries, steam irons, humidifiers, and even for use in medical devices where mineral deposits could pose a risk.
Moreover, distilled water is favored for personal consumption by those looking to avoid fluoride, chlorine, and other substances typically added to municipal water supplies. It's also preferred for cooking, where it can help in preserving the natural taste of foods and beverages.
Benefits of Using Distilled Water
- Health and Safety: Distilled water is free from potentially harmful contaminants that can affect health, offering a clean alternative especially important in areas with poor local water quality.
- Appliance Longevity: Using distilled water in appliances that generate steam can extend their life, preventing the build-up of mineral scale.
- Taste and Purity: For those sensitive to the taste of treated water, distilled water provides a neutral option that doesn’t interfere with the flavor of drinks or food.
- Control Over Water Quality: DIY distillation puts you in control, ensuring you know exactly how your drinking water is processed.
Creating distilled water at home is an empowering step towards self-sufficiency and health, providing not only a utility product but peace of mind. Whether for consumption, appliance maintenance, or other uses, the purity of distilled water made in your own kitchen is unparalleled. This guide will show you how to set up your home distillation station, step through the process, and provide tips to make it efficient and safe.
Section 1: Understanding Distillation
Distillation is a simple yet effective method for purifying water that utilizes the principles of evaporation and condensation to separate pure water from its contaminants. Understanding how this process works, the types of water it produces, and its various uses can help you appreciate why distillation might be a beneficial practice in your own home.
The Distillation Process
Heating: The process begins by heating water in a pot to its boiling point. As the water boils, it turns into steam, leaving most types of impurities behind, such as minerals, bacteria, and chemicals that have higher boiling points than water.
Evaporation: As the water converts into steam, it rises. Given that this steam is essentially water in its gas form, it is devoid of the impurities found in the liquid water below.
Condensation: The steam then comes into contact with a cold surface (usually a lid cooled by ice in DIY settings). Upon contact, the steam cools down and reverts to water, which is now distilled. This process effectively removes impurities that were in the original liquid.
Collection: The condensed water drips into a clean container, typically placed inside the boiling pot. This collected water is what we call distilled water.
Types of Water: Distilled, Purified, and Spring Water
Distilled Water: This is water that has been boiled into vapor and then condensed back to liquid in a separate container. Distillation removes virtually all impurities, including minerals, bacteria, and chemicals.
Purified Water: This term generally refers to water that has undergone any process to remove impurities, not limited to distillation. Methods like reverse osmosis, carbon filtration, and more fall under this category. Purified water typically has a very low level of impurities but may retain some minerals.
Spring Water: This type of water comes from an underground source and must be collected at the spring or through a borehole tapping the underground formation that feeds the spring. Spring water carries natural minerals and is often considered to have a fresher taste compared to distilled or purified water. However, it may also contain microorganisms and pollutants, depending on the source.
Uses of Distilled Water in Daily Life
Medical Applications: Distilled water is used in medical facilities for various applications where mineral-free water is necessary, such as in autoclaves, CPAP machines, or for mixing medications.
Automotive Uses: It's ideal for use in car cooling systems and batteries because it doesn’t contain ions and minerals that can build up and cause damage.
Appliances: Many household appliances such as steam irons, humidifiers, and air purifiers perform better and last longer when used with distilled water, as it prevents scaling and mineral deposit buildup.
Cooking and Drinking: Some people choose distilled water for cooking and drinking to avoid consuming impurities that might be found in tap water.
Cosmetics and Skincare: Distilled water is often used in the formulation of cosmetics and skincare products to ensure purity and stability.
Understanding these fundamentals of distillation, the distinctions among different types of water, and the broad utility of distilled water highlights its importance and versatility. In the next sections, we'll delve into how you can distill water at home and make use of this pure, clean resource in your daily life.
Section 2: What You'll Need
Distilling water at home requires some basic kitchen tools and a few additional items that might already be in your cupboard. Here’s a comprehensive list of what you'll need to set up your own DIY distillation process:
Essential Equipment and Materials
Heat Source: A reliable stove or an electric burner is essential for heating water to the point of vaporization. Ensure your heat source can sustain a steady temperature.
Large Pot with a Lid: The pot should be large enough to hold a significant amount of water and should be made of a material that can conduct heat well without leaching chemicals or flavors, such as stainless steel.
Small Pot or Heat-Safe Bowl: This will be placed inside the large pot to collect the distilled water. It should be made of a material that can withstand heat and not impart any flavors to the water, like glass or stainless steel.
Ice: Used to create a temperature difference that helps condense the steam back into water. You’ll need enough ice to cover the lid of the large pot during distillation.
Oven Mitts or Holders: Safety is crucial when handling hot equipment. Use oven mitts or pot holders to manage the hot pots and to avoid burns.
Storage Container for Distilled Water: After distillation, the water should be stored properly. Use a clean, airtight container. Glass is ideal because it doesn’t impart any flavors or chemicals to the water.
Optional Tools
Glass Condenser: For those looking to enhance the efficiency of their distillation setup, a glass condenser can be used. This tool increases the surface area for condensation, improving the yield of distilled water.
Thermometer: To monitor the temperature closely, a thermometer can be crucial, especially if you’re distilling for specific purposes that require precise temperature control.
These tools and materials will help you efficiently distill water at home, ensuring that you produce the cleanest and safest water possible. Next, we will walk through the step-by-step process of using these tools to distill water right in your own kitchen.
Section 3: Step-by-Step Guide to Making Distilled Water
Creating your own distilled water at home is a straightforward process that requires minimal equipment. Follow these steps to set up your distillation kit and start producing clean, pure water.
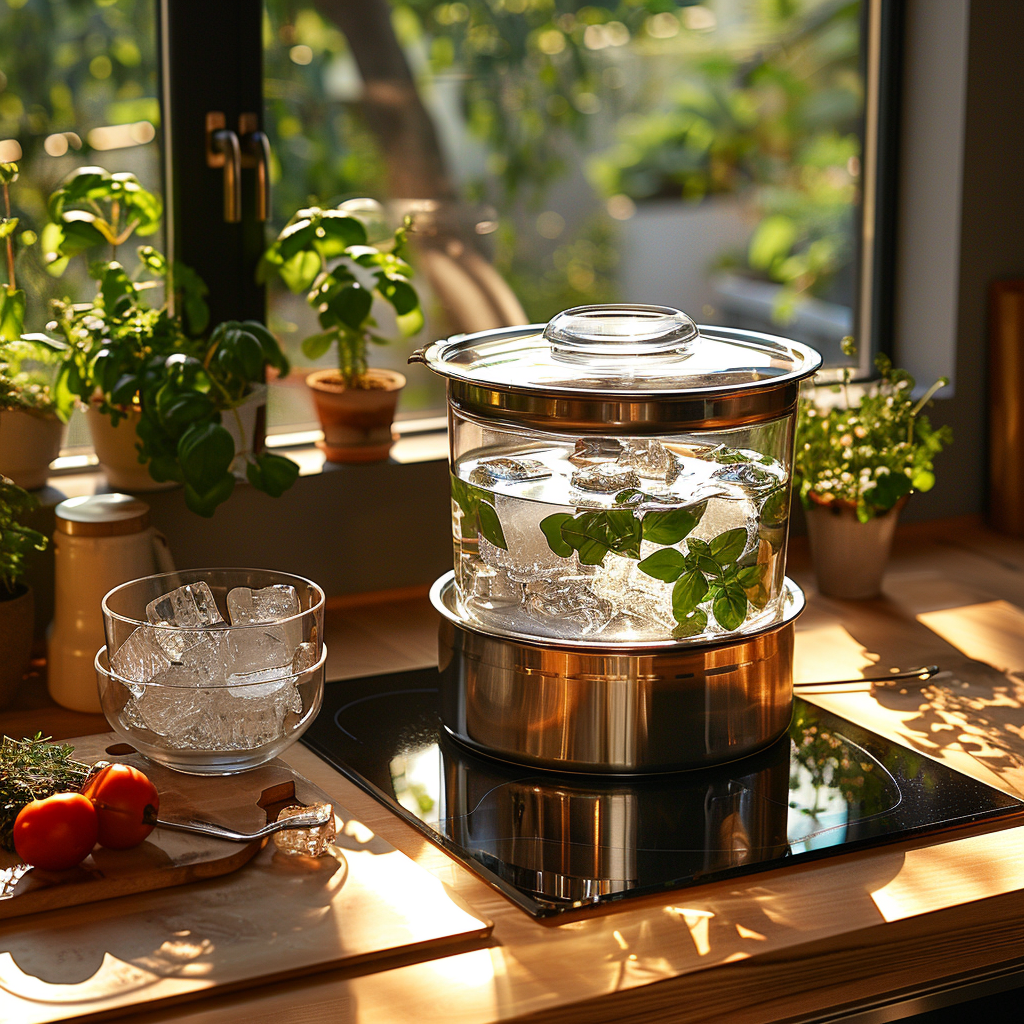
Step 1: Setup
Choose a Large Pot and a Smaller Pot or Bowl: Select a large pot that will serve as the base of your distillation setup. Inside this, place a smaller pot or heat-safe bowl. This smaller vessel will collect the distilled water, so it should not touch the bottom of the larger pot.
Position the Lid: The lid of the large pot should be inverted, creating a concave shape that helps to direct the condensed water into the smaller pot or bowl.
Prepare for Condensation: Arrange the setup on your stove or heat source. Ensure that everything is stable and safe before beginning.
Step 2: Boiling
Fill the Large Pot: Add water to the large pot, making sure it is not high enough to touch the smaller pot or bowl. The water in the large pot will be heated to create steam.
Begin Heating: Turn on your heat source to start boiling the water. Adjust the heat to maintain a steady boil, which maximizes steam production without splashing water into the collector.
Step 3: Condensation
Cool the Lid: Place ice on top of the inverted lid during the boiling process. The cold surface of the lid will cause the steam to condense into droplets of distilled water.
Monitor Ice: Replace the ice as it melts to maintain a cold condensation surface. This step is critical as it ensures that the steam condenses efficiently.
Step 4: Collection
Collect Distilled Water: As the steam condenses, droplets of water will form on the underside of the lid and drip into the smaller pot or bowl. Periodically check the amount of water collected.
Handle with Care: Use oven mitts or pot holders to remove the collection pot or bowl, as it and the steam can be very hot.
Step 5: Storage
Cool Before Storing: Allow the distilled water to cool to room temperature before transferring it to a storage container.
Use Appropriate Containers: Store the distilled water in clean, airtight containers to avoid contamination. Glass is ideal because it does not leach any chemicals into the water.
Keep in a Cool, Dark Place: Store the water in a cool, dark place to preserve its purity. Avoid direct sunlight, which can encourage algae or bacterial growth even in distilled water.
By following these steps, you can efficiently produce distilled water at home, ensuring a supply of pure, contaminant-free water for various uses.
Section 4: Safety Tips and Considerations
Creating distilled water at home is a relatively safe process, but it involves handling hot equipment and boiling water, which can pose risks if not managed properly. Below are essential safety tips and considerations to ensure that your DIY distillation process is both safe and effective.
Precautions to Avoid Burns or Spills
Stable Setup: Ensure that all equipment is stable and securely placed. The large pot should be on a stable surface, and the smaller collection pot should be securely positioned so that it does not tip over or move during boiling.
Handle with Care: Always use oven mitts or heat-resistant gloves when handling the hot pots, especially when removing the collection pot or adjusting the setup. Steam can cause severe burns, so be cautious when checking or altering the setup.
Control Heat Source: Monitor the heat source closely to maintain a controlled boil. Overheating can cause rapid boiling and splashing, which not only poses a burn risk but can also disrupt the condensation process.
Gradual Cooling: Allow the equipment to cool down gradually after turning off the heat to avoid thermal shock and potential burns from steam or hot water.
Avoid Overfilling: Do not fill the boiling pot too high with water. An overfilled pot can boil over, leading to spills and possible burns.
Importance of Using Non-Toxic Materials in the Distillation Setup
Material Safety: Use pots and collection containers made from non-toxic materials. Stainless steel or glass are preferred because they do not leach chemicals at high temperatures, ensuring the purity of your distilled water.
Check Equipment Condition: Regularly inspect your equipment for any signs of wear, rust, or degradation. Compromised materials can contaminate the distilled water and might also pose health risks.
Avoid Plastic: If possible, avoid using plastic components in areas of high heat exposure. Certain plastics can release harmful chemicals when heated. If you must use plastic, ensure it is high-quality and rated for high temperatures.
Clean Equipment Before Use: Thoroughly clean all parts of your distillation setup before each use. This prevents any residues or impurities from contaminating the distilled water.
Ventilation: Ensure adequate ventilation in your distillation area. The process of boiling and cooling can increase humidity and heat, which, if confined, might affect comfort and safety.
By following these safety tips and considerations, you can minimize the risks associated with DIY water distillation and enjoy the benefits of clean, pure water without any complications. Safety should always be a priority in any home-based project, particularly when dealing with high temperatures and DIY equipment setups.
Section 5: Enhancing Your Setup
Once you have mastered the basic process of distilling water at home, you may want to consider enhancing your setup to increase efficiency, improve safety, and possibly scale up production. Here are some suggestions for upgrades and enhancements to your DIY distillation setup:
Using a Glass Condenser for More Efficient Condensation
Upgrade to a Glass Condenser: A glass condenser can greatly improve the efficiency of the condensation process in distillation. It allows for a more controlled and rapid conversion of steam back to water, increasing the amount of distilled water you can produce in a session.
Installation Tips: Integrate the glass condenser by connecting it to the outlet of the steam from your boiling pot. Ensure it is securely attached and that there are no leaks where the steam could escape.
Benefits: A condenser increases the surface area for condensation, resulting in faster collection times and potentially purer water, as it minimizes the chance for re-evaporation and contamination.
Implementing a Thermometer to Monitor Water Temperature
Choose the Right Thermometer: Select a thermometer that can withstand high temperatures and provide accurate readings. A digital thermometer with a remote sensor is ideal for monitoring without having to open the setup and risk scalds or contamination.
Placement: Place the thermometer in a position where it can accurately measure the temperature of the steam without being directly in the water. This placement helps in maintaining the optimal temperature for efficient boiling and condensation.
Monitoring and Adjustments: Regularly check the thermometer to ensure that the water is being heated to the correct temperature for boiling without becoming too hot, which could waste energy and potentially damage your equipment.
Tips for Scaling Up the Process
Larger Equipment: If you need more distilled water, consider using a larger pot for boiling and a bigger or additional collection container. Ensure your heat source and condenser can accommodate the larger volume.
Multiple Setups: Another method for scaling up is to run multiple distillation setups simultaneously. This requires more space and careful management to maintain safety and efficiency.
Scheduled Distillation: Create a distillation schedule to continuously produce distilled water without overloading your equipment. This approach helps in managing large volumes effectively.
Energy Efficiency: Consider the energy cost of scaling up. Using a more efficient heat source or insulating your pots can help minimize heat loss and reduce the energy required for boiling.
Safety First: As you scale up, maintain strict adherence to safety protocols. Larger volumes of boiling water and increased steam can present additional risks, so ensure your setup remains stable and secure.
By enhancing your distillation setup, you can improve both the quantity and quality of the distilled water you produce. Whether you're looking to increase efficiency with a glass condenser, monitor your process more closely with a thermometer, or scale up your production, these improvements will help you achieve a more professional setup right at home.
Section 6: Common Problems and Troubleshooting
Distilling water at home can sometimes lead to challenges, such as a slow condensation rate or finding impurities in your distilled water. Below are some troubleshooting tips to help you identify and resolve common issues in your DIY distillation setup.
Problem 1: Slow Condensation Rate
Causes and Solutions:
Inadequate Cooling: If the condensation rate is slow, it might be due to insufficient cooling of the lid or condenser. Ensure that you have enough ice or a properly functioning condenser to maintain a low temperature, which is crucial for rapid condensation.
Steam Escaping: Check for any gaps or leaks where steam might be escaping from the setup. Make sure that the lid is inverted properly and seals the pot tightly. Use heat-resistant seals if necessary to prevent steam from escaping.
Low Heat: While too much heat can be wasteful, too little heat can cause a slow boil that doesn't produce enough steam. Adjust your heat source to ensure a steady, robust boil.
Problem 2: Impurities in the Distilled Water
Causes and Solutions:
Contamination from Equipment: Ensure that all equipment is thoroughly cleaned and free of any residues or contaminants before you begin distilling. Use non-reactive materials such as glass or stainless steel for all parts of the setup that come into contact with water.
Re-condensation: Sometimes, distilled water can reabsorb impurities if the storage container or condensation area is exposed to air. Store distilled water in airtight, clean glass containers immediately after collection to prevent contamination.
Improper Handling: Always handle distilled water with clean equipment and hands to avoid introducing new contaminants into the water after distillation.
Problem 3: Inefficient Production
Causes and Solutions:
Equipment Size Mismatch: Ensure that the size of your boiling pot and the collection container are appropriate for the amount of water you aim to distill. Too small a collection container might not catch all the distilled water, whereas a pot that's too large might result in a longer heating time.
Lack of Insulation: To maximize heat retention, consider insulating your boiling vessel. This can reduce heat loss, making the process more energy-efficient and potentially speeding up the distillation process.
Problem 4: Equipment Damage
Causes and Solutions:
Regular Wear and Tear: Regularly inspect and maintain your equipment. Replace items like rubber seals or cracked bowls that can affect the efficiency of your distillation process.
Corrosion and Scaling: If you're using tap water for distillation, be aware of potential scaling or corrosion over time, especially in metal components. Regular cleaning and occasional descaling (using vinegar or a similar mild acid) can help maintain the integrity and cleanliness of your setup.
By understanding these common problems and knowing how to troubleshoot them, you can ensure a more reliable and efficient distillation process. Regular maintenance and careful operation are key to producing high-quality distilled water at home.
Section 7: Environmental Impact and Considerations
Distilling water at home can have both positive and negative environmental implications. Understanding these impacts can help you make more informed decisions about whether to distill water at home or purchase it. Additionally, employing energy-efficient practices can minimize your environmental footprint.
Environmental Impact of DIY vs. Purchased Distilled Water
Carbon Footprint: The energy source used for heating water in home distillation typically involves electricity or gas, which can contribute to a high carbon footprint depending on your local energy mix. In contrast, industrial distillation may use more efficient technologies and cleaner energy sources at scale, potentially lowering the carbon footprint per liter of distilled water produced.
Packaging and Transportation: Purchasing distilled water often means buying plastic bottles, which contribute to plastic waste and pollution. The transportation of bottled water from factories to stores also generates carbon emissions. By distilling water at home, you reduce the demand for bottled water, thus decreasing plastic waste and emissions associated with transportation.
Resource Efficiency: Home distillation can be less efficient compared to industrial processes that optimize energy use and have higher yields. However, by distilling water at home, you have control over the source of water and the amount you produce, potentially leading to less waste.
Tips for Energy-Efficient Distillation Practices
Optimize Batch Size: Distill water in batches that match your daily or weekly needs to avoid unnecessary repetition and energy use. Using the right size of equipment for your needs can also enhance energy efficiency.
Insulate Your Equipment: Minimize heat loss by insulating your boiling vessel. This can be done by wrapping it in an insulating material which helps retain heat, reducing the energy required to maintain the boiling point.
Use Efficient Heating Methods: Consider the type of heating element used. Induction stoves are generally more efficient than electric coils or gas burners because they reduce heat loss, making them ideal for distillation.
Solar Distillation: Explore alternative energy sources like solar power for distilling water. Solar distillation setups can be effective, especially in sunny climates, and have a negligible carbon footprint once installed.
Recycle Heat: If possible, use the residual heat from other activities. For example, after using your oven, you can place the distillation setup nearby to utilize the escaping heat.
Proper Maintenance: Keep your distillation equipment in good condition. Regular maintenance ensures efficient operation and extends the lifespan of the equipment, thereby reducing waste and the need for replacements.
Consider Off-Peak Hours: If your electricity pricing varies by time, run your distillation process during off-peak hours when electricity is cheaper and demand on the grid is lower.
By taking these environmental impacts and considerations into account, you can make more sustainable choices about how you produce and consume distilled water. Employing energy-efficient practices not only helps reduce your environmental footprint but can also lead to savings on energy costs.
Conclusion
Creating distilled water at home offers a range of benefits, from ensuring you have access to pure, contaminant-free water to reducing your environmental impact by decreasing reliance on bottled water. This process allows you to control the quality of water you consume and use in various household appliances, potentially extending their lifespan and improving their efficiency.
Experimenting with home distillation can be a rewarding endeavor. It provides an opportunity to refine the process to suit your personal or household needs, whether you're aiming for better health, more environmentally friendly living, or simply the satisfaction of DIY self-sufficiency.
Call to Action
Have you tried distilling water at home? What methods have you found most effective? Share your experiences, tips, or any questions you might have in the comments below. Your insights could help others improve their distillation setups and encourage more people to try this sustainable practice.